What Is a Meta Robots Tag?
A meta robots tag is HTML code that tells search engine robots how to crawl, index, and display a page’s content.
It goes in the <head> section of the page and can look like this:
<meta name="robots" content="noindex">The meta robot tag in the example above tells all robots not to index the page.
Let’s discuss what robots meta tags are used for, why they’re important for SEO, and how to use them.
Meta Robots vs. Robots.txt
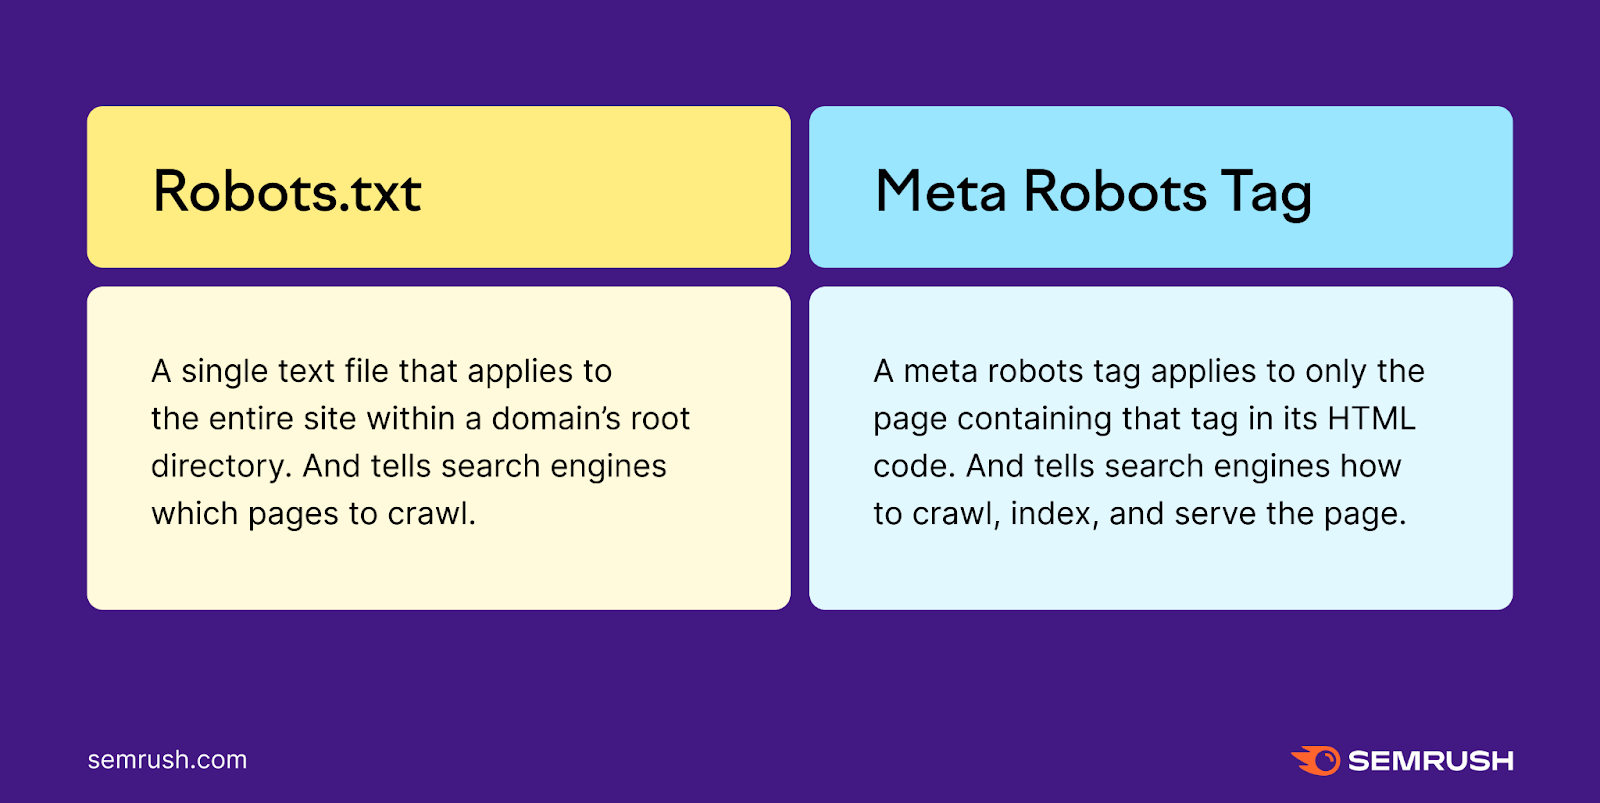
Meta robots tags and robots.txt files have similar functions but serve different purposes.
A robots.txt file is a single text file that applies to the entire site. And tells search engines which pages to crawl.
A meta robots tag applies to only the page containing the tag. And tells search engines how to crawl, index, and display information from the page.
What Are Robots Meta Tags Used For?
Robots meta tags help control how Google crawls and indexes a page's content. Including whether to:
- Include a page in search results
- Follow the links on a page
- Index the images on a page
- Show cached results of the page on the search engine results pages (SERPs)
- Show a snippet of the page on the SERPs
We’ll explore the attributes you can use to tell search engines how to interact with your pages.
But first, let’s see why robots meta tags are important and how they can affect your site’s SEO.
How Do Robots Meta Tags Affect SEO?
Robots meta tags help Google and other search engines crawl and index your pages efficiently.
Especially for large or frequently updated sites.
After all, you likely don’t need every page on your site to rank.
For example, you don’t want search engines to index:
- Pages from your staging site
- Confirmation pages, such as thank you pages
- Admin or login pages
- Internal search result pages
- Pay-per-click (PPC) landing pages
- Pages with duplicate content
Combining robots meta tags with other directives and files, such as sitemaps and robots.txt, is critical for your technical SEO strategy.
What Are the Name and Content Specifications for Meta Robots Tags?
Meta robots tags contain two attributes: name and content. Both are required.
Name
This attribute indicates which crawler should follow the instructions in the tag.
Like this:
name="crawler"If you want to address all crawlers, insert “robots” as the “name” attribute.
For example:
name="robots"Note: Both attributes are non-case sensitive.
But there are many other crawlers. And you can choose as many (or as few) as you want.
Plus, search engines can have more than one crawler.
For example, Google’s main crawler is Googlebot. But each of the many Google crawlers serve a different purpose.
Here are a few other common crawlers:
- Bing: Bingbot (see the list of all Bing crawlers here)
- DuckDuckGo: DuckDuckBot
- Baidu: Baiduspider
- Yandex: YandexBot
Content
The “content” attribute contains instructions for the crawler.
Like this:
content="instruction"Without a robots meta tag, crawlers will index and follow by default.
Meaning they’ll show the page in the SERPs and follow all the links (unless a link has a “nofollow” tag).
So, if you don’t want crawlers to do that, you must add a meta robots tag.
Google supports the following “content” values:
Noindex
The meta robots “noindex” value tells crawlers not to include the page in the index or display in the SERPs.
<meta name="robots" content="noindex">Without the noindex value, search engines may index and serve the page or resource in the search results.
Nofollow
Tells crawlers not to crawl the links on the page.
<meta name="robots" content="nofollow">Google and other search engines use links on pages to discover those linked pages (and pass link equity).
Use this rule if you don’t want the crawler to follow any links on the page.
Noarchive
Tells Google not to serve a copy of your page in the search results.
<meta name="robots" content="noarchive">If you don’t specify this value, Google may show a cached copy of your page that searchers may see in the SERPs.
You could use this value for time-sensitive content, internal documents, PPC landing pages, or any other page you don’t want Google to cache.
Noimageindex
Instructs Google not to index the images on the page.
<meta name="robots" content="noimageindex">This rule is only useful in certain (specific) cases. Always using “noimageindex” could hurt potential organic traffic from image results.
Notranslate
Prevents Google from serving translations of the page in search results.
<meta name="robots" content="notranslate">If you don’t specify this value, Google can show a translation of the title and snippet of a search result for pages that aren’t in the search query’s language.

If the searcher clicks the translated link, all further interaction is through Google Translate. Which automatically translates any followed links.
Use this value if you prefer not to have your page translated by Google Translate.
For example, if you have a product page with product names you don’t want translated. Or if you find Google’s translations aren’t always accurate.
Nositelinkssearchbox
Tells Google not to generate a search box for your site in search results.
<meta name="robots" content="nositelinkssearchbox">If you don’t use this value, Google can show a search box for your site in the SERPs.
Like this:
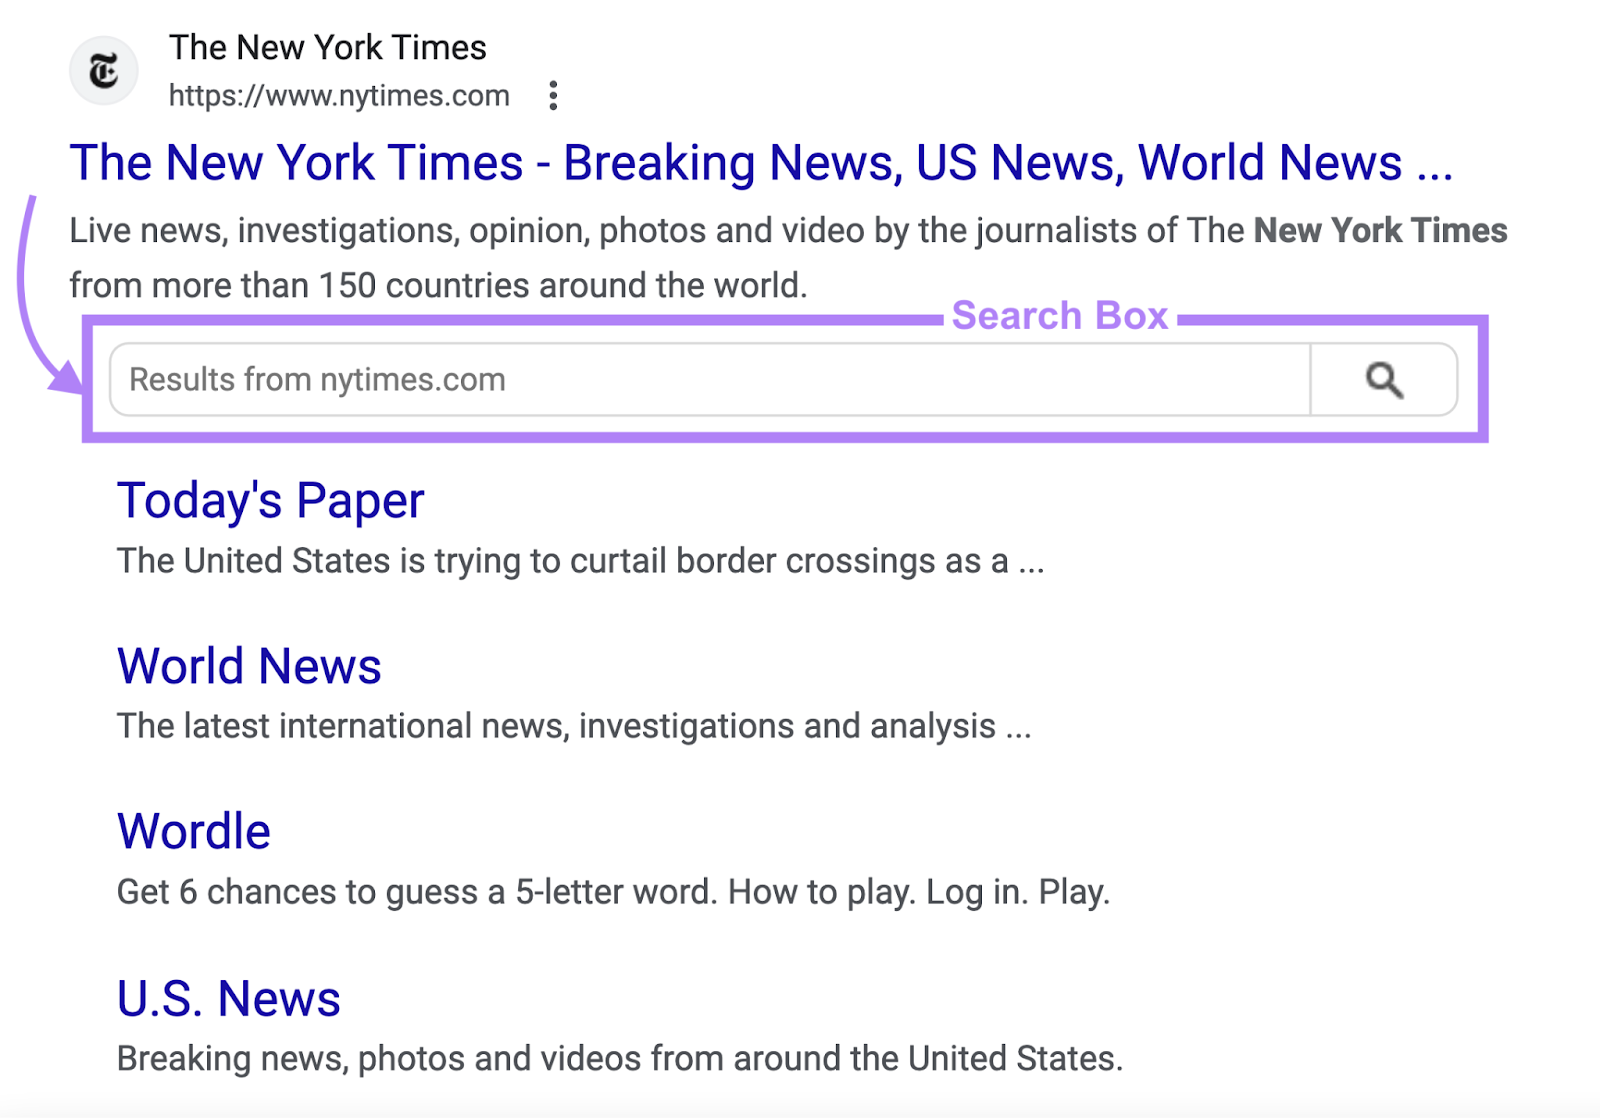
Use this value if you don’t want the search box to appear. For example, if you want to drive traffic to that specific ranking page.
Nosnippet
Prevents Google from showing a text snippet or video preview of the page in search results.
<meta name="robots" content="nosnippet">Without this value, Google can produce snippets of text or video based on the page’s content.
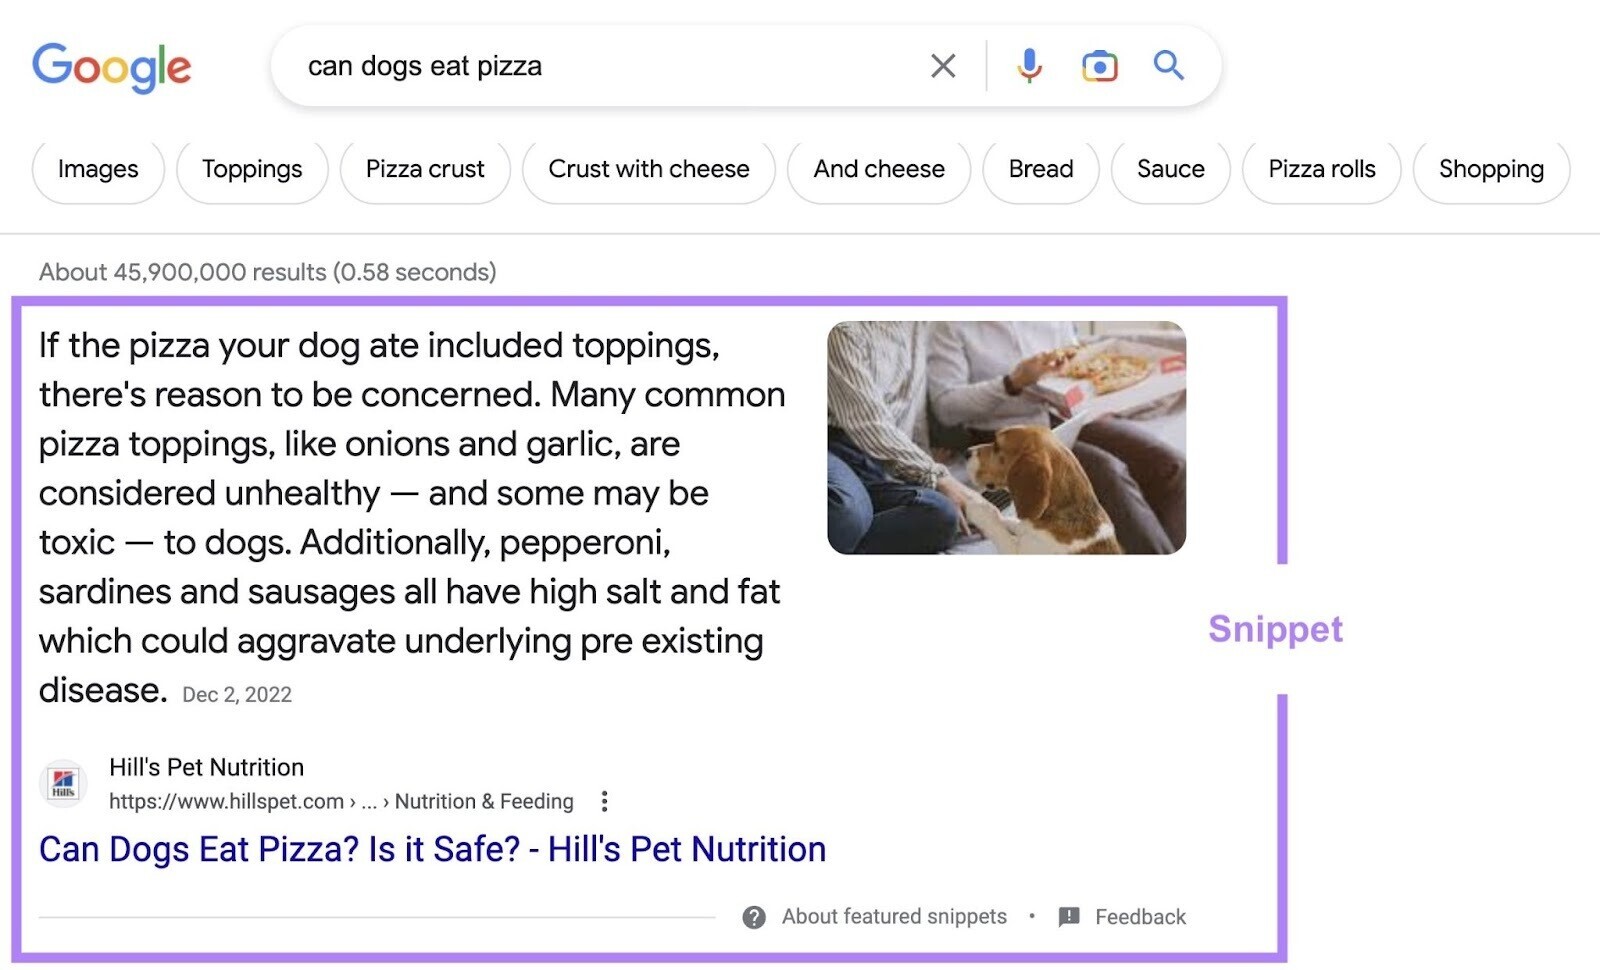
For example, you can use this value when you’ve meticulously written your meta description and don’t want Google to rewrite it.
Max-snippet
Tells Google the maximum character length it can show as a text snippet for the page in search results.
This attribute has two important elements:
- “0” opts your page out of text snippets (as with “nosnippet”)
- “-1” indicates there’s no limit
For example, to prevent Google from displaying a snippet in the SERPs:
<meta name="robots" content="max-snippet:0">Or, if you want to allow up to 100 characters:
<meta name="robots" content="max-snippet:100">To indicate there’s no character limit:
<meta name="robots" content="max-snippet:-1">Max-image-preview
Tells Google the maximum size of a preview image for the page in the SERPs.
There are three values for this directive:
- “None”: Google won’t show a preview image
- “Standard”: Google may show a default preview
- “Large”: Google may show a larger preview image
<meta name="robots" content="max-image-preview:large">Google recommends using this value to indicate the largest image on the page. Large images, when shown in Google Discover, helps the page stand out and can result in more traffic.
Max-video-preview
Tells Google the maximum length for a video snippet in the SERPs.
As with “max-snippet,” there are two important values for this directive:
- “0” will opt your page out of video snippets
- “-1” indicates there’s no limit
For example, the tag below allows Google to serve a video preview of up to 10 seconds:
<meta name="robots" content="max-video-preview:10">Use this rule if you want to limit your snippet to show certain parts of your videos. If you don’t, Google may show a video snippet of any length.
Indexifembedded
This new tag lets Google index the page’s content embedded in another page through HTML elements such as iframes—despite a “noindex” tag.
<meta name="robots" content="noindex, indexifembedded">This is an important tag if you embed content on your site. Now you have more control and can indicate how the content on the page is indexed.
Note: The “indexifembedded” rule only takes effect when accompanied by a “noindex” tag.
Unavailable_after
Prevents Google from showing a page in the SERPs after a specific date and time.
<meta name="robots" content="unavailable_after: 2022-10-21">You must specify the date and time using RFC 822, RFC 850, or ISO 8601 formats.
Use this value for limited-time event pages, time-sensitive pages, or pages you no longer deem important.
Note: Google ignores this rule if there isn’t a specified date/time. By default, there isn’t an expiration date for content.
Other Search Engines
Want to add meta robots tags for other search engines? The below table shows the supported values for each:
| Value | | Bing | Baidu | Yandex |
| index | Y | Y | Y | Y |
| noindex | Y | Y | Y | Y |
| noimageindex | Y | N | N | N |
| follow | Y | Y | Y | Y |
| nofollow | Y | Y | Y | Y |
| noarchive | Y | Y | Y | Y |
| nocache | N | Y | N | N |
| nosnippet | Y | Y | Y | Y |
| nositelinkssearchbox | Y | N | N | N |
| notranslate | Y | N | N | N |
| max-snippet | Y | N | N | N |
| max-video-preview | Y | N | N | N |
| max-image-preview | Y | N | N | N |
| indexifembedded | Y | N | N | N |
| unavailableafter | Y | N | N | N |
What Is the X-Robots-Tag?
An x-robots-tag serves the same function as a meta robots tag but for non-HTML files. Such as images and PDFs.
It can be included as part of the HTTP header response to a URL.
Like this:
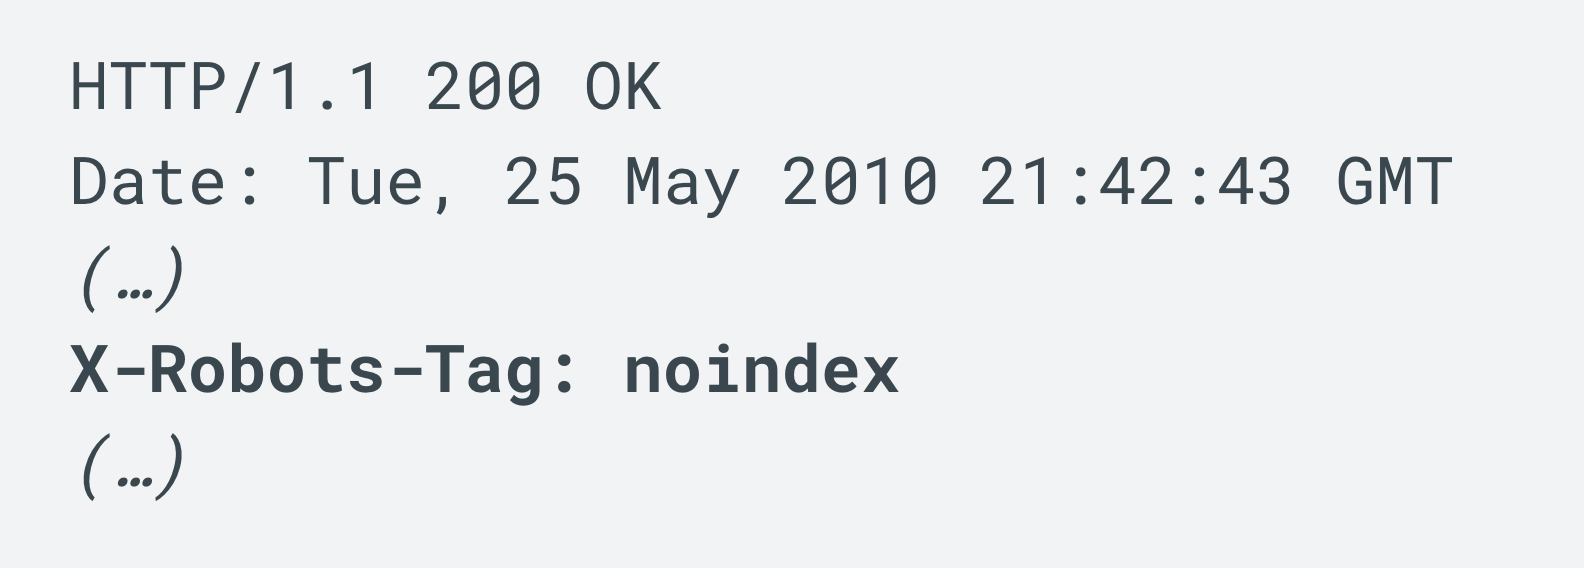
To implement the x-robots-tag, you'll need to access your site's website’s header .php, .htaccess, or server configuration file.
How to Implement Robots Meta Tags
Robots Meta Tags in HTML Code
If you can edit your page’s HTML code, add your robots meta tags into the <head> section of the page.
For example, if you want search engines not to index the page but still follow the links, use:
<meta name="robots" content="noindex, follow">Robots Meta Tags in WordPress
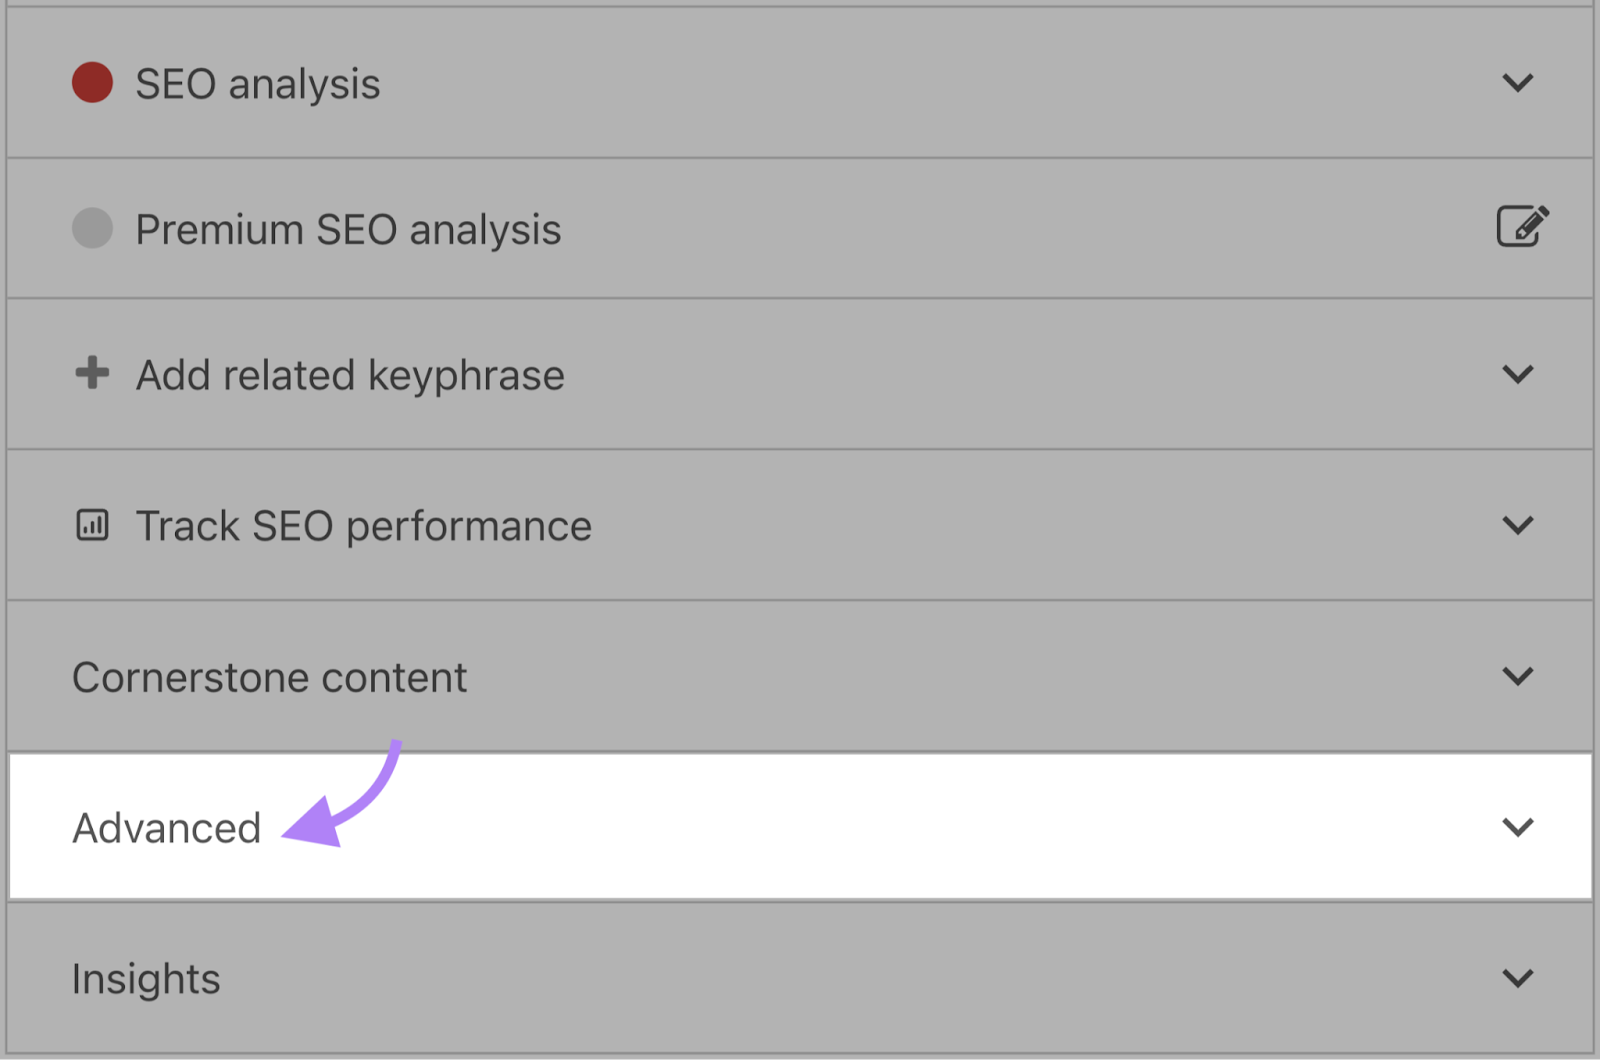
If you're using a plugin like Yoast SEO, open the “Advanced” tab in the block below the page editor.
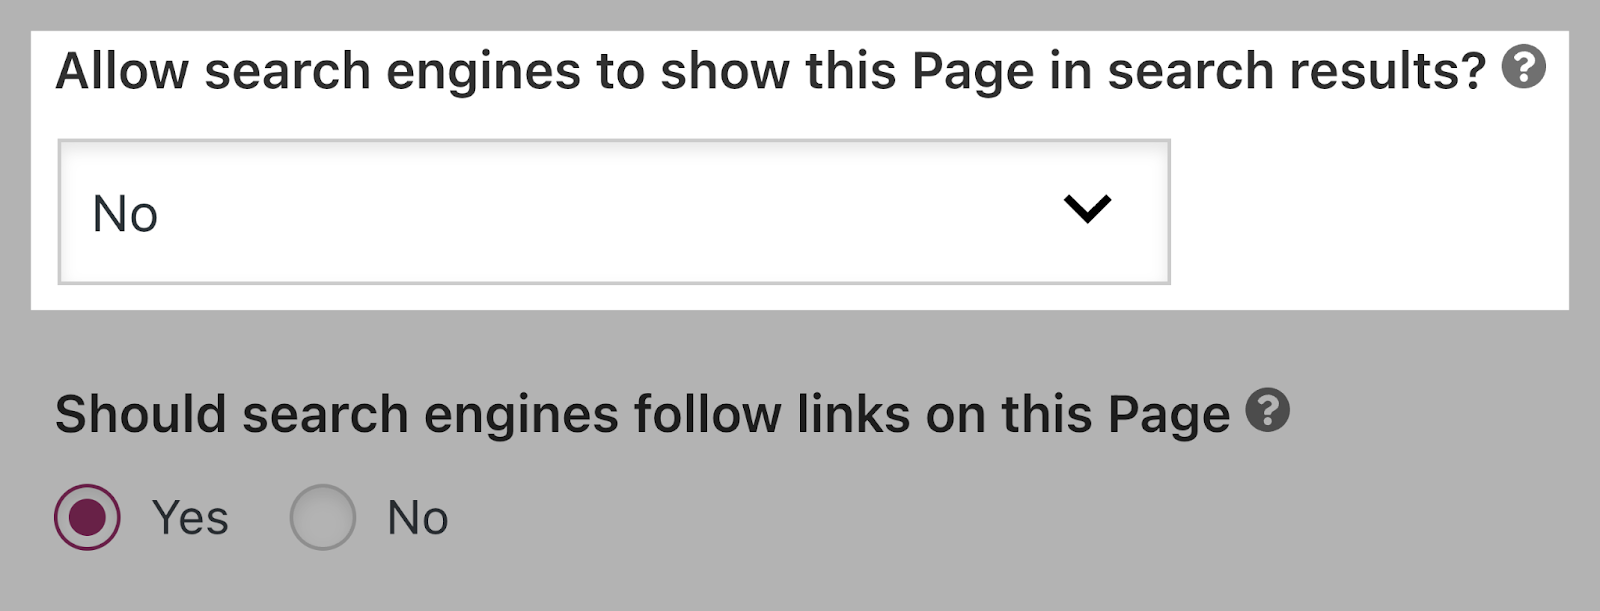
Set the “noindex” directive by switching the “Allow search engines to show this page in search results?” drop-down to “No.”
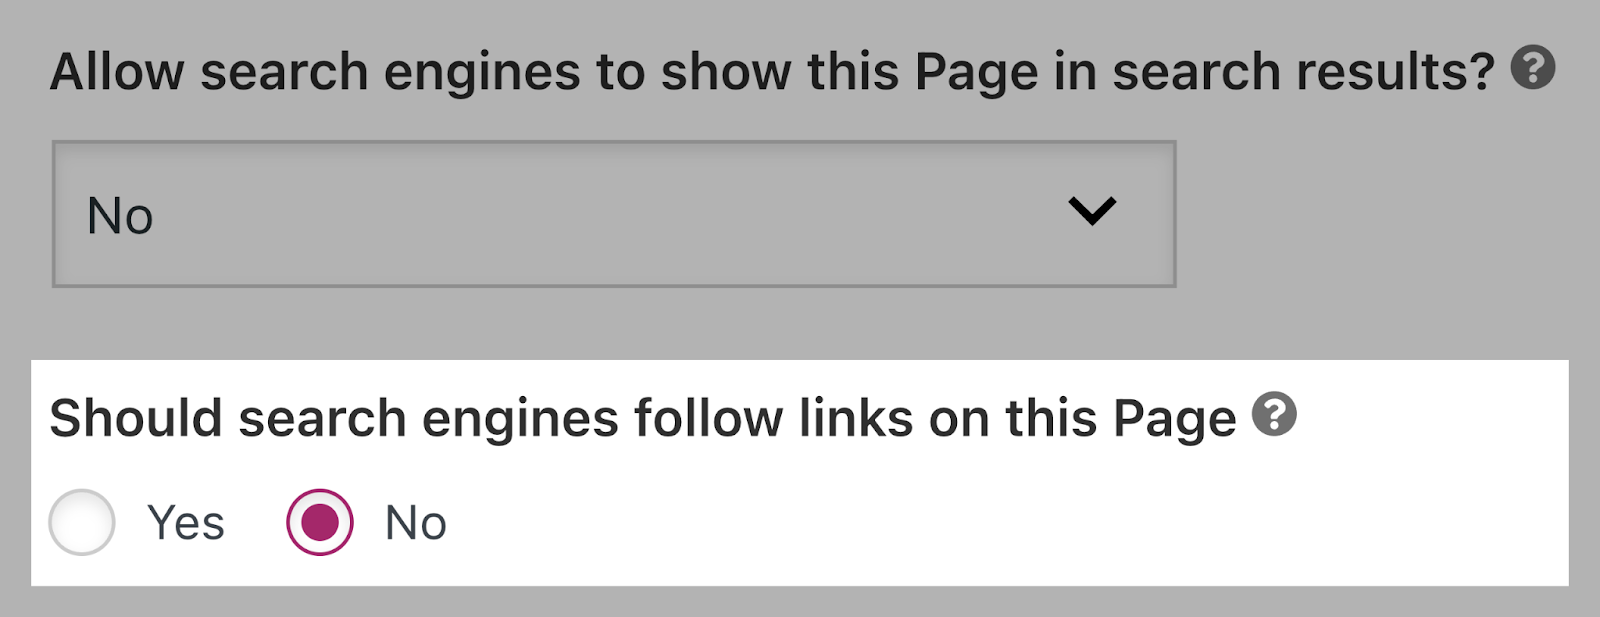
Or prevent search engines from following links by switching the “Should search engines follow links on this page?” to “No.”
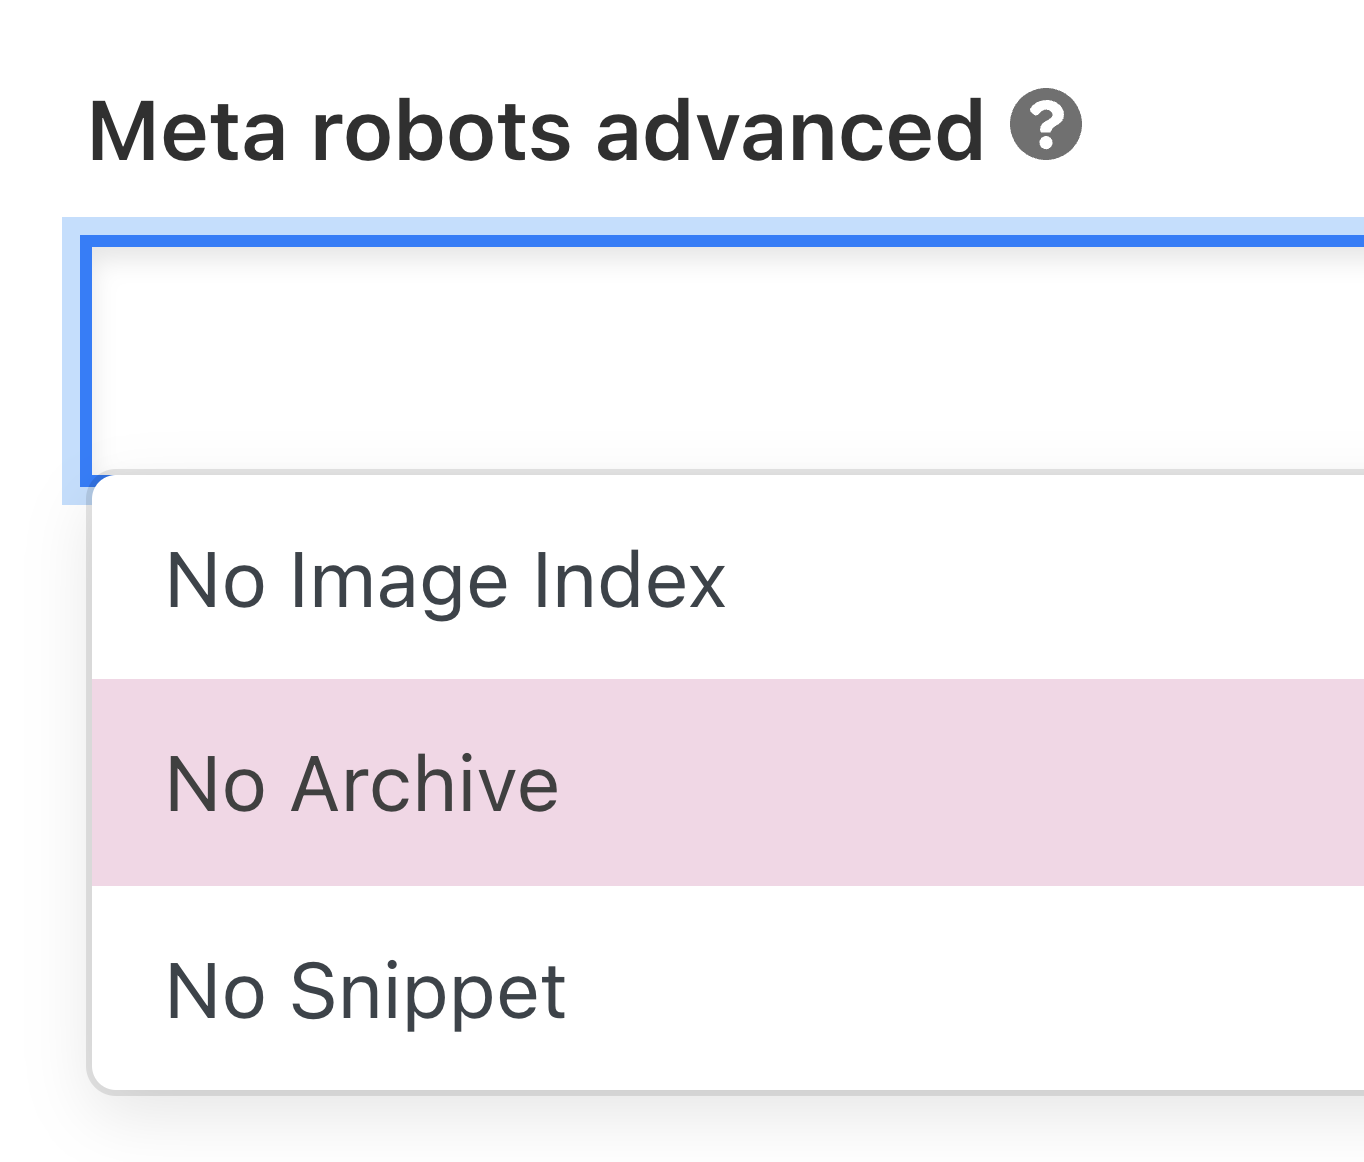
For other directives, you have to implement them in the “Meta robots advanced” field.
Like this:
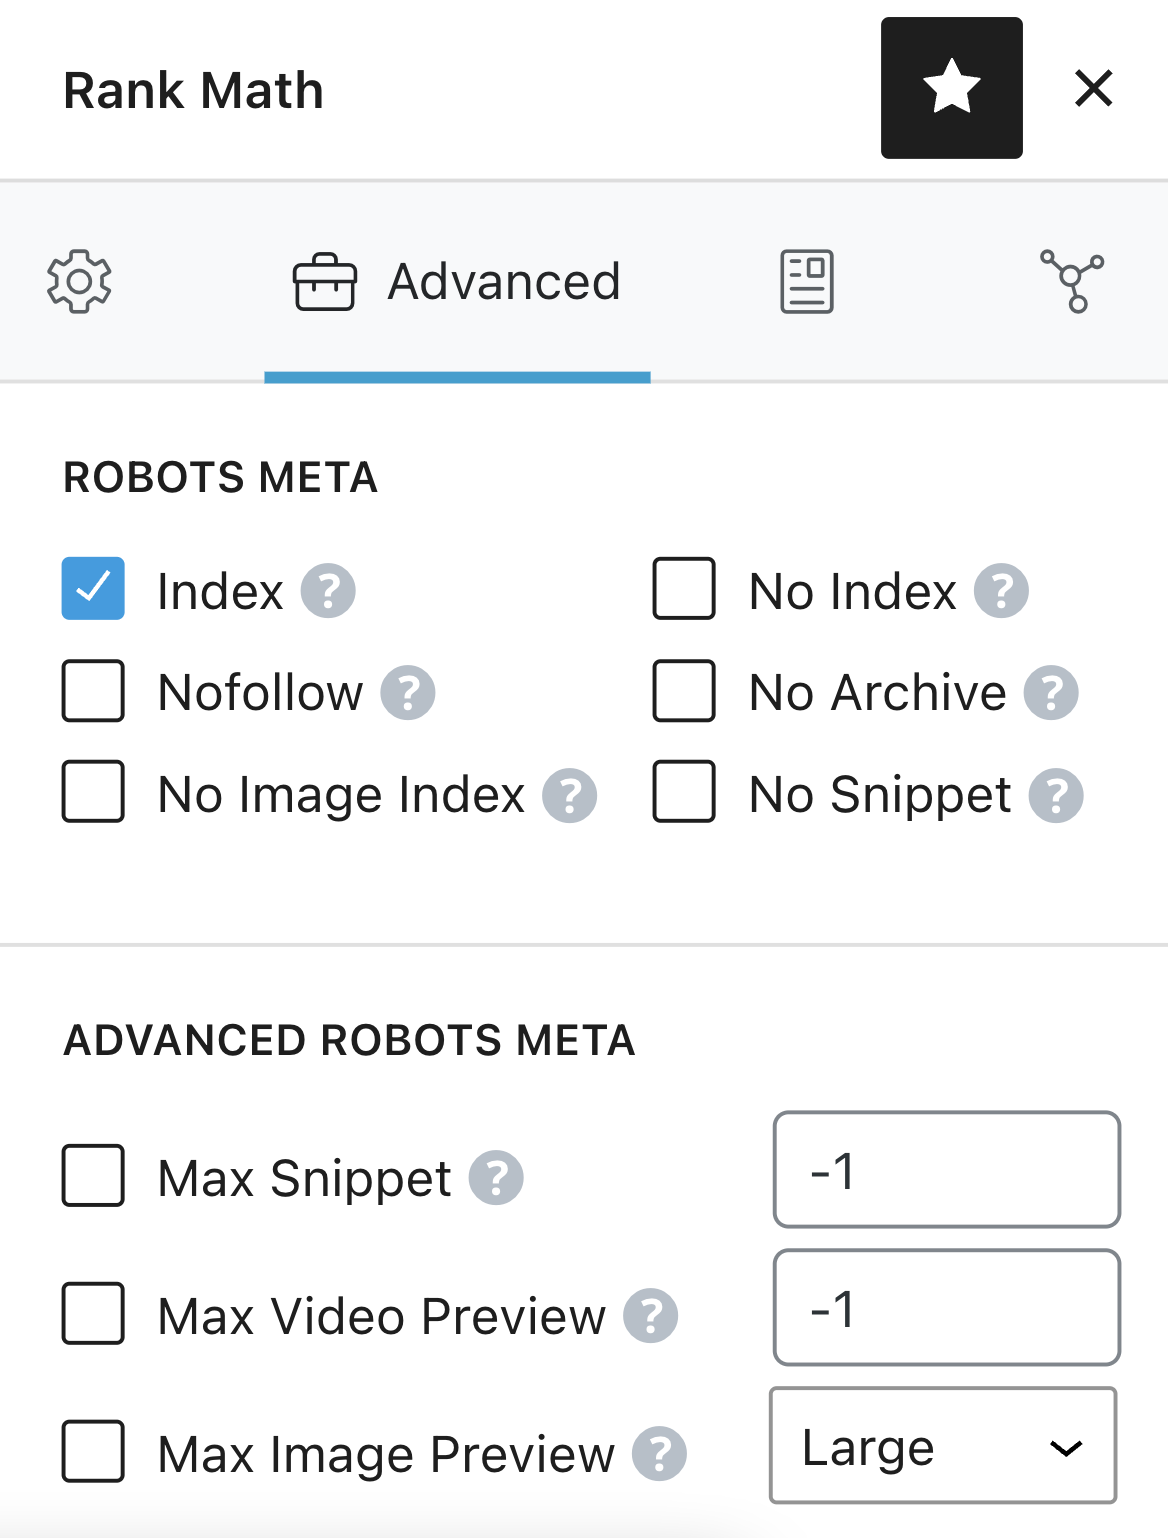
If you’re using Rank Math, select the robots directives straight from the “Advanced” tab of the meta box.
Like so:
Robots Meta Tags in Shopify
To implement robots meta tags in Shopify, edit the <head> section of the theme.liquid layout file.
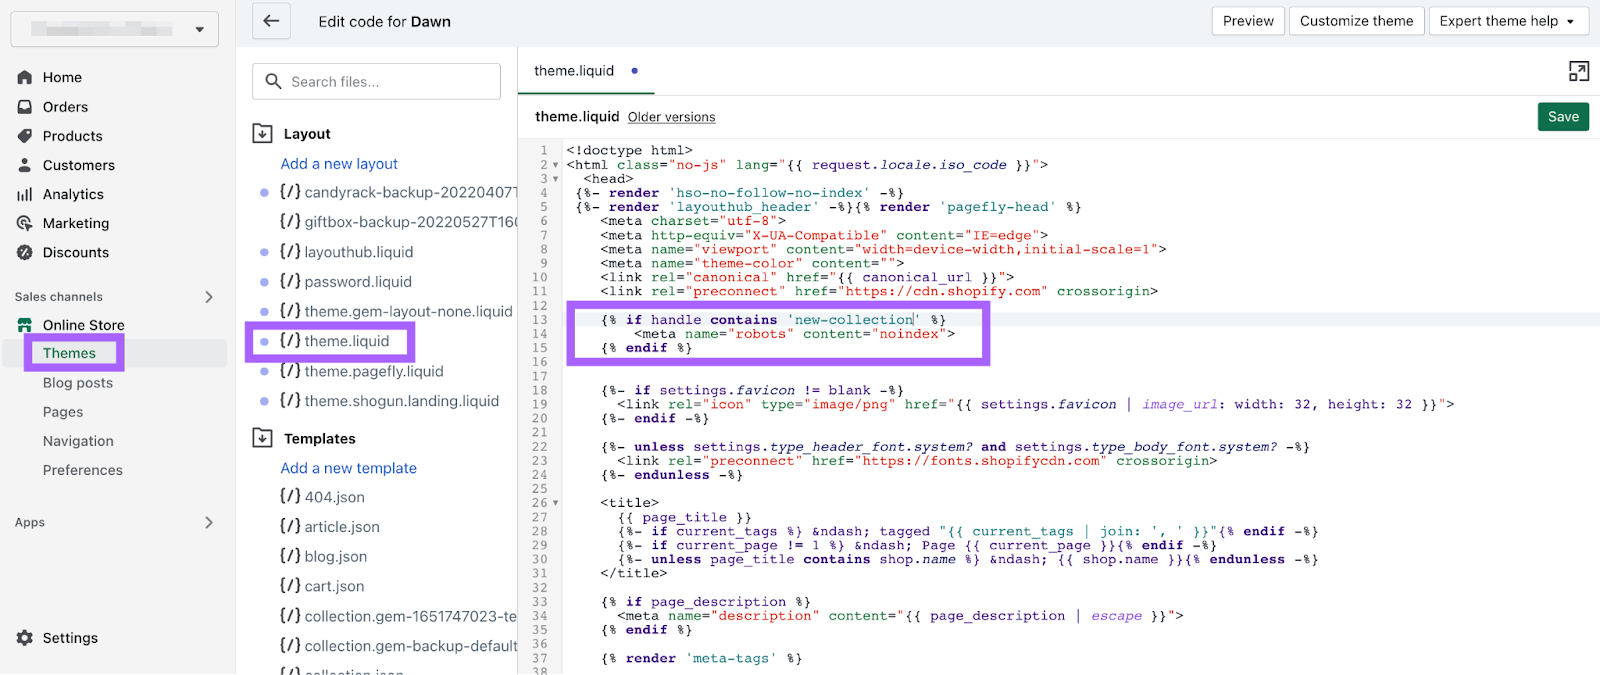
To set the directives for a specific page, add the code below to the file:
{% if handle contains 'page-name' %}
<meta name="robots" content="noindex, follow">
{% endif %}
This instructs search engines not to index /page-name/ but to follow all the links on the page.
You must create separate entries to set the directives across different pages.
Note: Be extremely cautious when editing theme files. Mistakes here can significantly harm your site. If you’re uncomfortable with this risk, ask a qualified developer for help.
How to Implement X-Robots-Tags
Using X-Robots-Tag on an Apache Server
To use the x-robots-tag on an Apache web server, add the following to your site's .htaccess file or httpd.config file.
<Files ~ "\.pdf$">
Header set X-Robots-Tag "noindex, follow"
</Files>
For example, the code above indicates the file type is “.pdf” and instructs search engines not to index the file but to follow any links.
Using X-Robots-Tag on an Nginx Server
If you're running an Nginx server, add the code below to your site's .conf file:
location ~* \.pdf$ {
add_header X-Robots-Tag "noindex, follow";
}
The example code above will apply a “noindex” attribute and follow any links in a “.pdf” file.
Common Meta Robots Tag Mistakes to Avoid
Let’s take a look at some mistakes to avoid when using meta robots and x-robots-tags.
Meta Robots Directives on a Page Blocked by Robots.txt
If you disallow a page in your robots.txt file, bots won’t crawl it. Any meta robots tags or x-robots-tags on that page will be ignored.
Ensure pages with meta robots tags or x-robots-tags can be crawled.
If a page has never been indexed, a robots.txt “disallow” rule should be enough to prevent it from showing in search results. But we still recommend adding a meta robots tag.
Adding Robots Directives to the Robots.txt File
Although never officially supported by Google, you once were able to add a “noindex” directive to your site's robots.txt file.
This is no longer an option, as confirmed by Google.
The “noindex” rule in robots meta tags is the most effective way to remove URLs from the index when you do allow crawling.
Removing Pages with a ‘Noindex’ Directive from Sitemaps
If you’re trying to remove a page from the index using a “noindex” directive, leave the page in your site's sitemap until it has been removed.
Removing the page before it’s deindexed can cause delays in deindexing.
Not Removing the ‘Noindex’ Directive from a Staging Environment
Preventing robots from crawling pages in your staging site is a best practice. But the “noindex” directive is commonly forgotten once the site is moved into production.
And the results can be disastrous. Search engines may never crawl and index your site.
Before moving your site from a staging platform to a live environment, double-check that all robots directives are correct.
Audit Your Site’s Crawlability
Finding and fixing crawlability issues (and other technical SEO errors) on your site can dramatically improve performance.
If you don’t know where to start, create a Semrush account to run your first audit for free with the Site Audit tool.
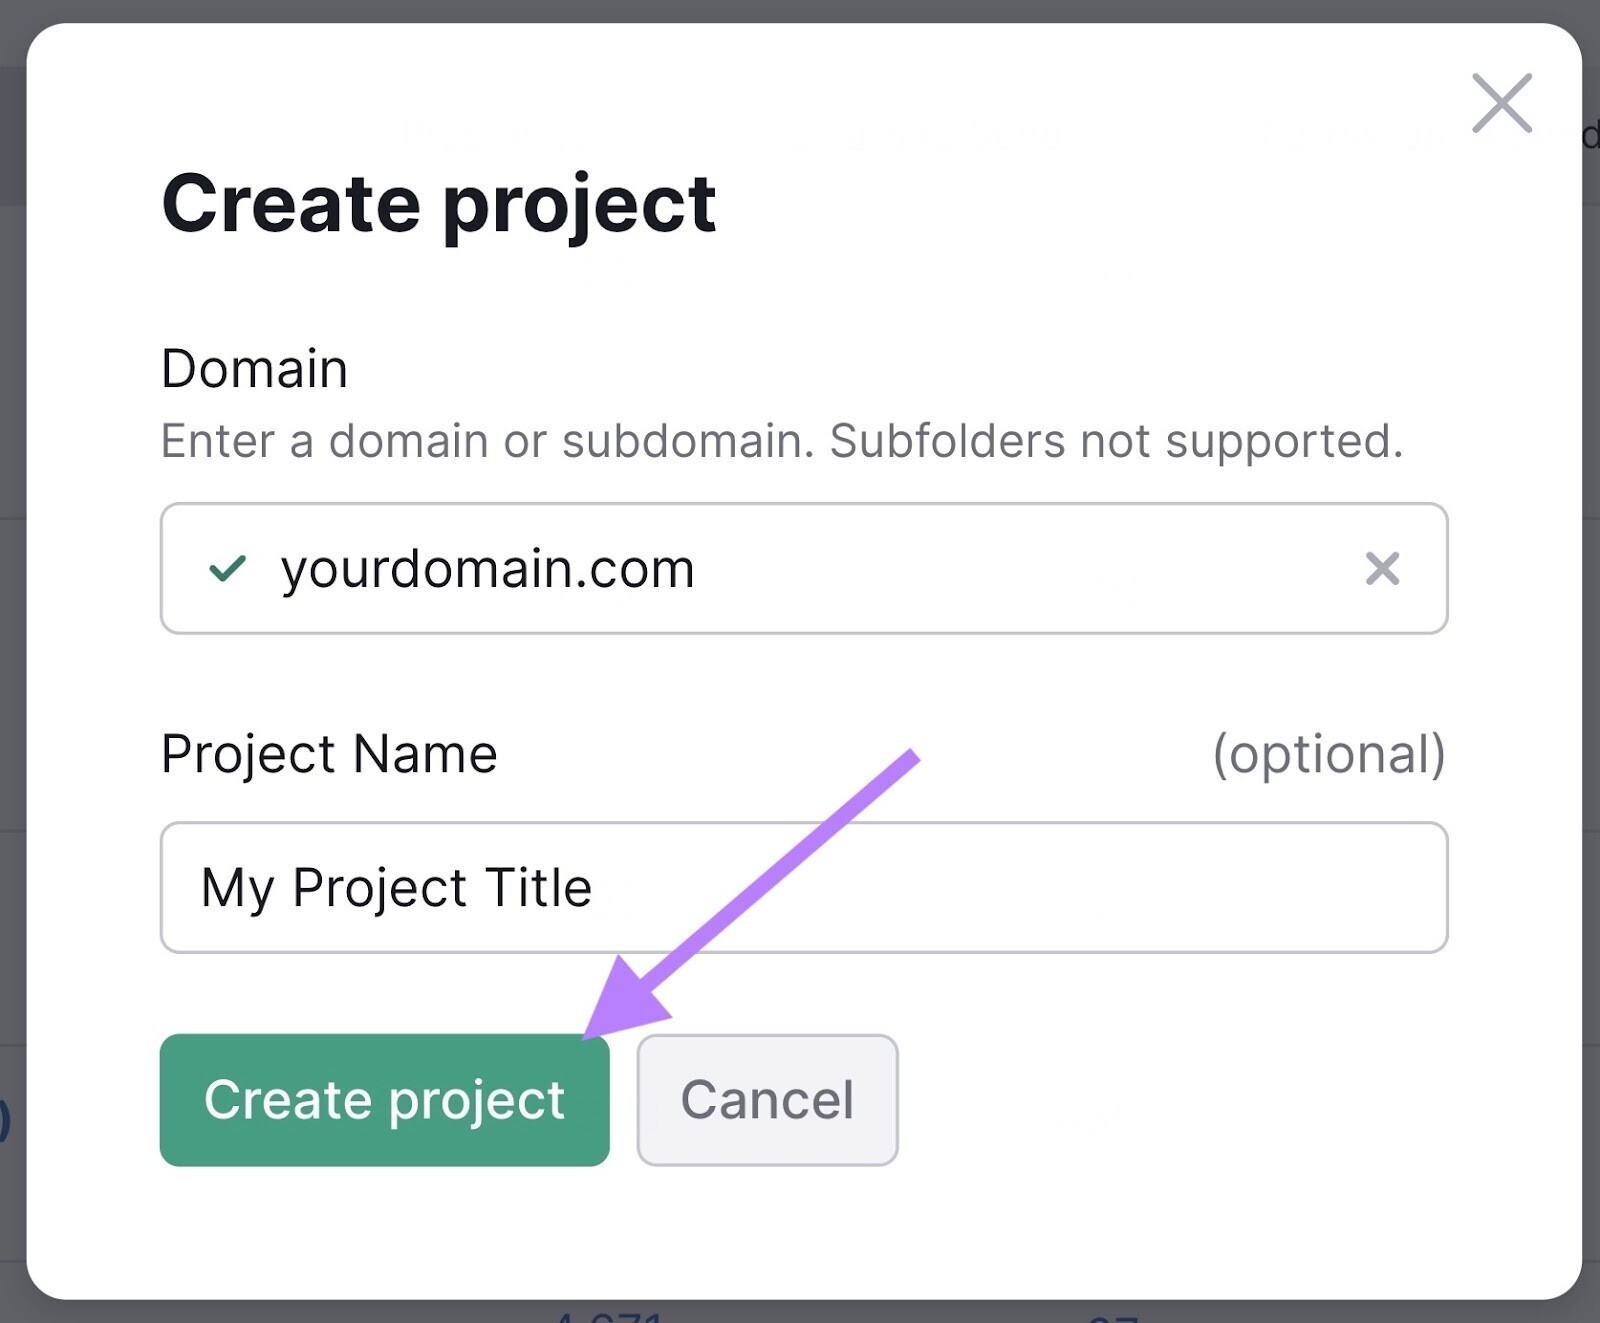
First, enter your domain and click “Create project.”
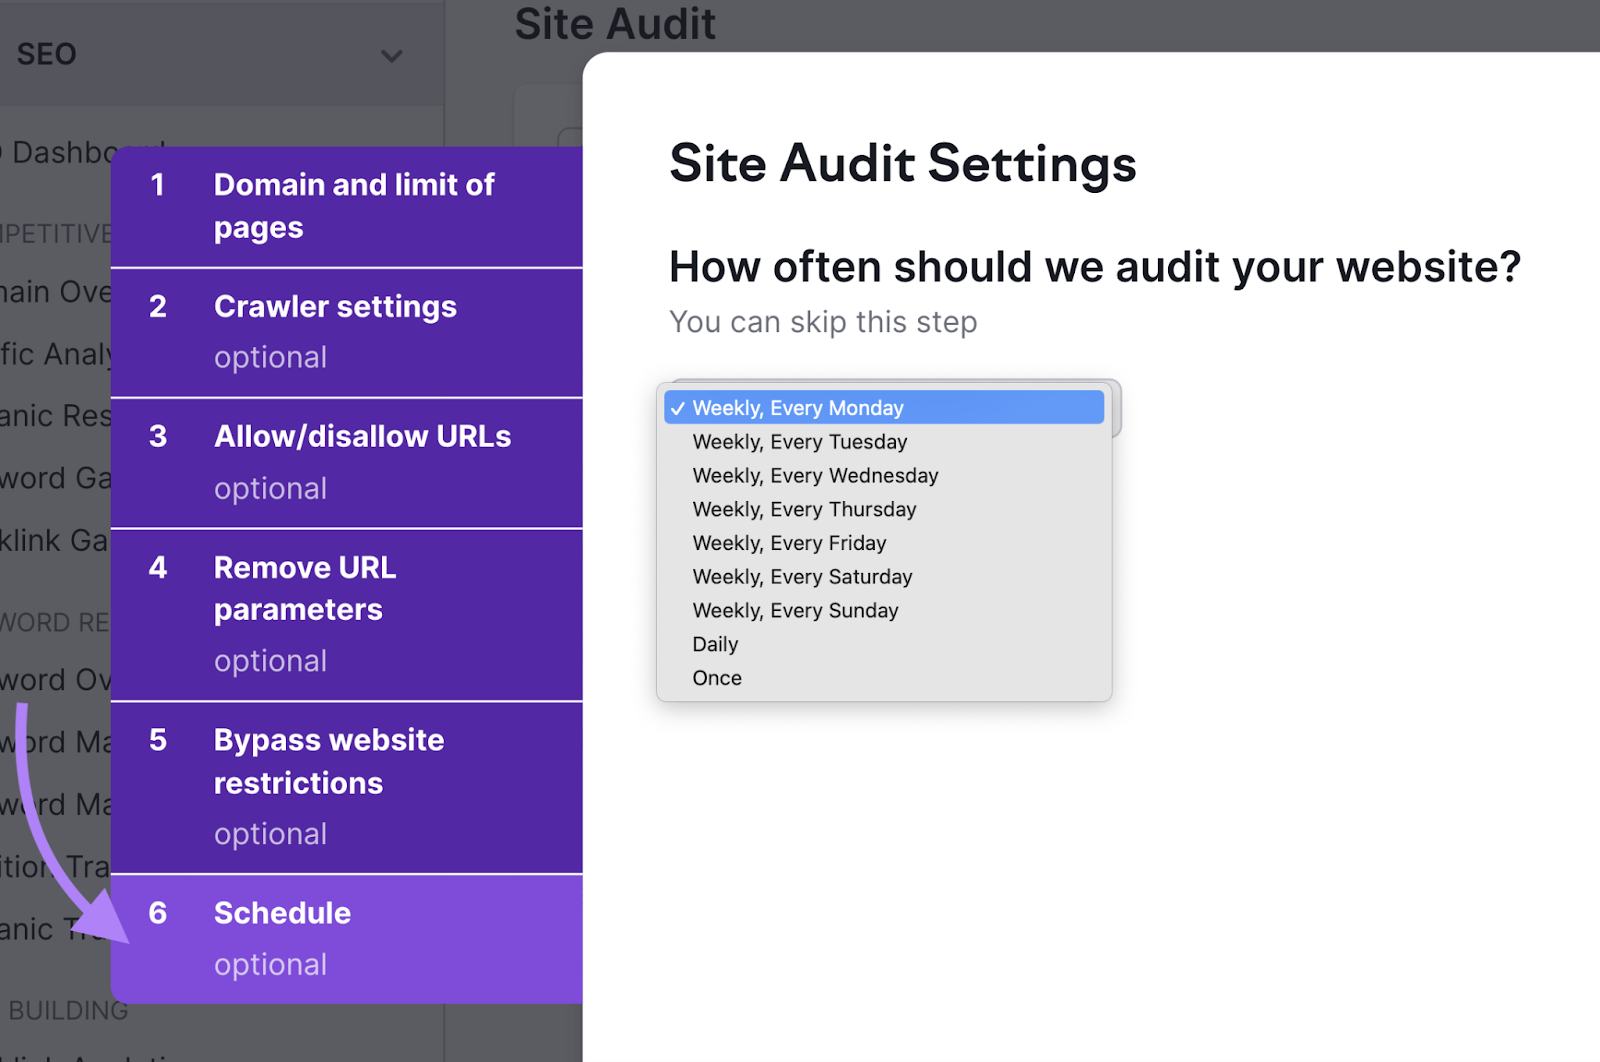
In the audit settings, select the “Schedule” tab.
And click the drop-down to select your preferred day of the week for the tool to automatically run the audit.
Now, click “Start Site Audit.”

Once the tool has audited your site, head to the “Issues” tab.
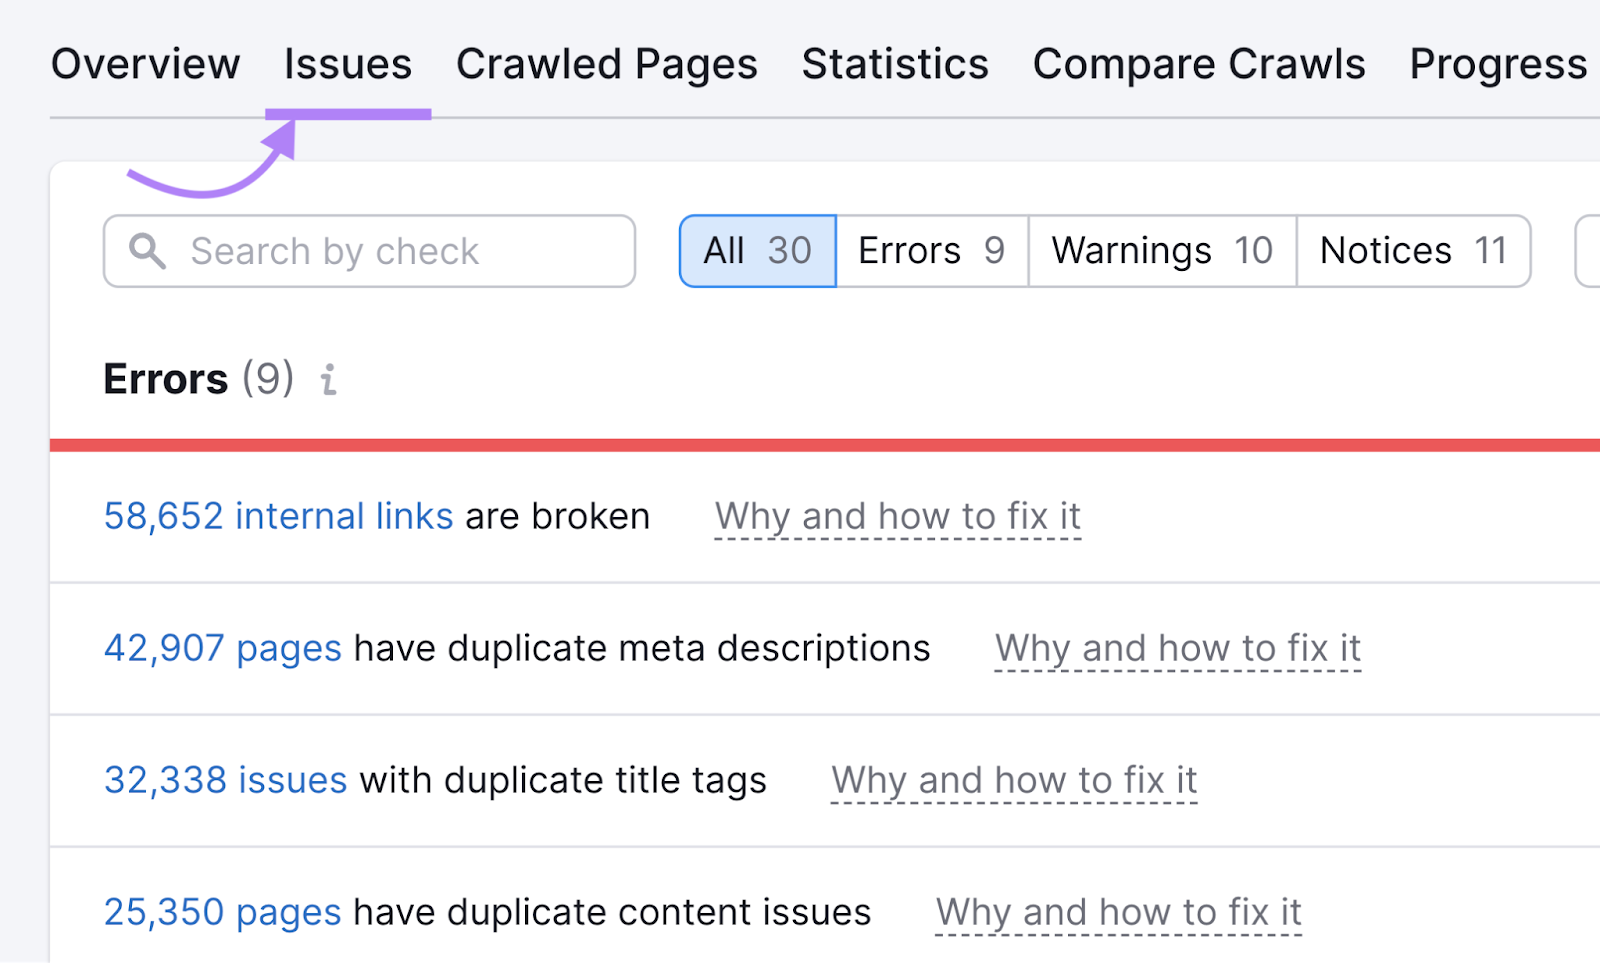
In the search box, type “robots” to see errors regarding meta robots tags, x-robots-tags, and your robots.txt file.
Like this:
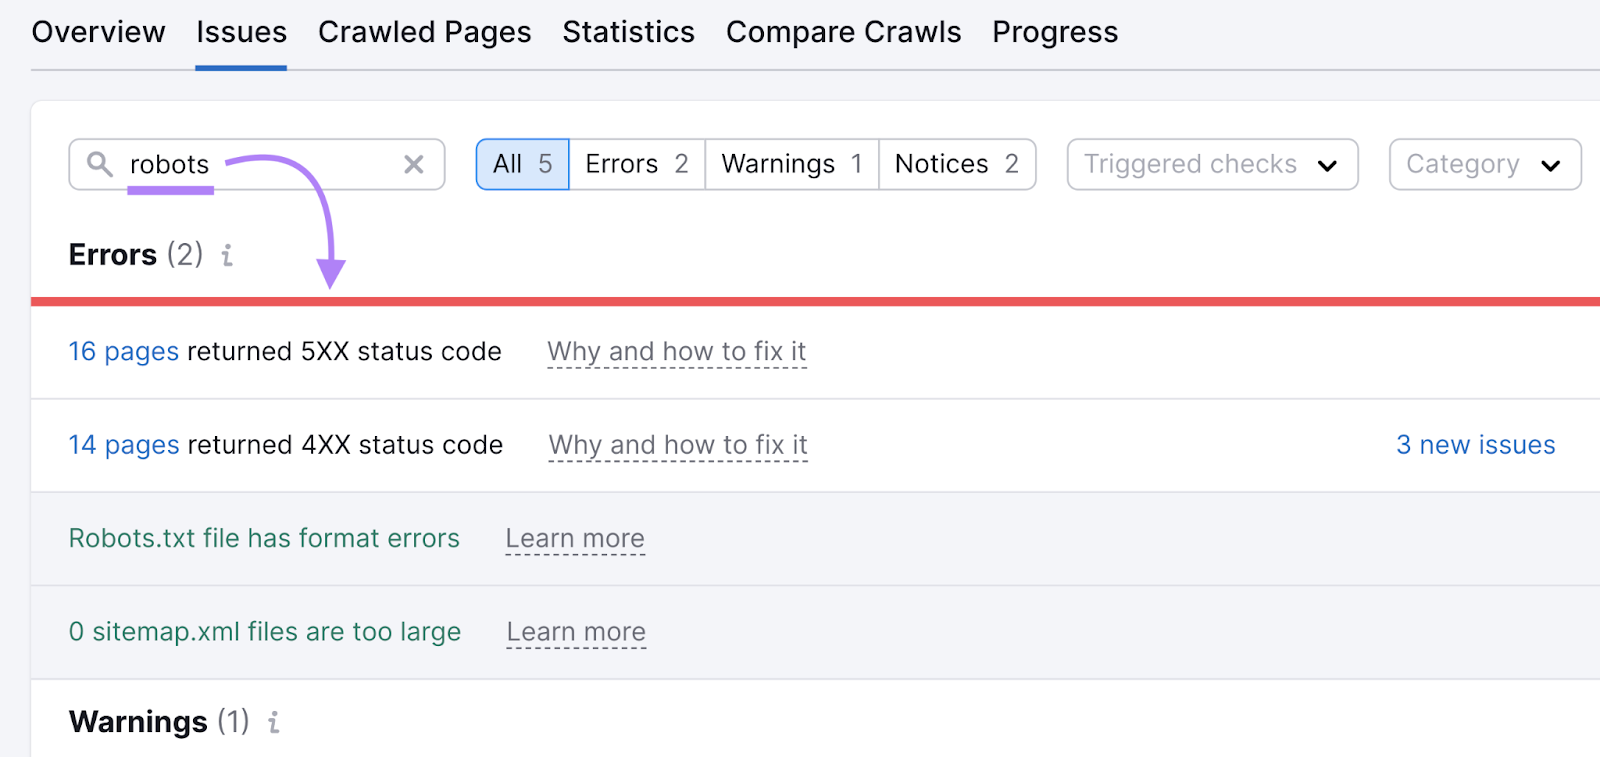
Click on “Learn more” next to an issue to read more about the issue and how to fix it.
Fix all errors first, then warnings, and then the issues. And watch your performance improve over time.
